
One essential skill that we need to master is called differential focusing.
It's not really about using a specific camera control or setting, but rather it's about how we use a combination of depth of field, composition and thinking about how the subject we are photographing will look to the viewer.
So it's more of a conceptual thing. Differential focusing is about isolating a single subject using a short depth of field and considering where you will place the emphasis, the focal point in your composition and how it will relate to all the other, out-of-focus elements in your composition.
Let's have a look at some examples.
In the image below is a signpost indicating the National Cycle Network. On it's own it doesn't make much of a photo. But if I wait for a cyclist to ride past in the background, it makes a more interesting shot. Showing an out-of-focus cyclist in the background gives the sign added meaning and context, it allows us to understand the point of the image.
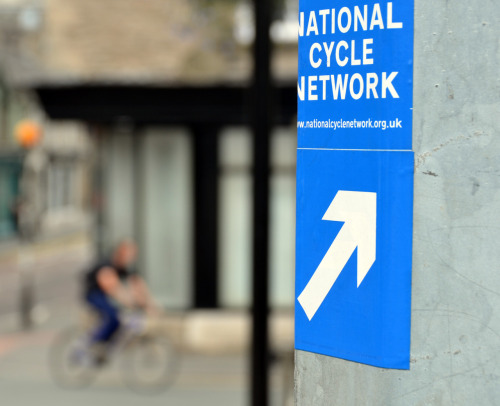 I needed to separate the subject (the sign) from the background (the cyclist) so I differentiated between them by using a short DOF to isolate the subject. A cyclist eventually turned up about 10 minutes later and I shot the photo. The background relates to the foreground and it gives us lots of meaning and information. But the subject remains the sign. This is differential focusing working well. Photographers use this idea all the time.
Here are some more examples:
Example 1: Sailing boat mooring at the dock.
 The story that I wanted to tell here, was all about the activity on the landing stage, about the sailors tying up their boats and working with ropes and so on. The ropes and lines therefor were important and I wanted to make sure they stood out as the subject. The answer was to focus in on the ropes and the hands of the sailor, keeping them sharp and making them the focal point, differentiating between them and the boat in the background. The boat is the context, the ropes are the subject. They relate to each other. Using a short depth of field to throw the background out of focus allows me to focus your attention on the subject, rather than the background.
Example 2: Wine glass on a table
 In this shot, the subject is the glass of wine. It creates an atmosphere and an ambience for the photo of a restaurant table setting. The white napkins and table service are not, in themselves particularly interesting but the wine glass, with it's rich colour and illusion to an appetizing meal to come, offers a perfect focal point. I am able to include the impression of the rest of the table setting by including it all as a soft, out-of-focus back drop and foreground. Controlling the depth of field to just include the wine glass allows me to do this. This is differential focusing being used to create a
story or an idea.
Example 3: Map and compass
 In this shot, the story is all about navigation on the fells. The sharp focus on the hands, using a map and compass show us that these are the important subjects. I have separated them from the background by using a short depth of field to throw the background scenery out of focus. I have therefore differentiated between subject (map and compass) and context (background scenery). If I included the background scenery in sharp focus there is a danger that the story or the meaning of the photo would be lost. It might start to look more like a landscape photo!
Example 4: Computer keyboard
 Remember, differential focusing isn't just about controlling a short depth of field - it also allows us to make connections between subject and background. Sometimes the out-of-focus background gives us more information, more meaning and is therefore more important than the in-focus subject. In this shot, it's only the out-of-focus background elements that allow us to infer that this shot is all about people using computers. It's not just a still-life photo of a computer keyboard.
Controlling your depth of field:
 Let's look at what we need to consider in order to control where our depth of field, or zone of sharp focus falls.
Foreground
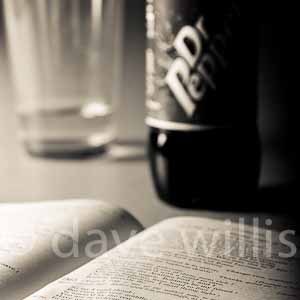
In this photo, the elements consist of a book, a drink and a glass. The aim of the shot is focus the viewers attention on foreground subject (book) but use the other elements (drink and glass) to provide some simple background context.
The book is placed close to the camera lens. This will immediately create a short DOF. Remember that DOF is relative to subject-to-camera distance. The shorter the distance, the shorter the DOF. The lens is set at 70mm, a short telephoto setting. Telephoto lenses shorten DOF because they have the effect of bringing the subject closer to the camera, another way of creating a short subject-to-camera distance.
We have created a situation now, where focusing on the book, close to the lens with a telephoto will guarantee that any DOF we get will remain very small. In fact it's so small that we get away with shooting at f8. When we're close up, we get a tiny DOF at any aperture setting.
So as long as the other elements of the photo are placed at a reasonable distance they are guaranteed to fall outside of the zone of sharpness, the DOF. OK, that was easy. Now let's move to the middle distance...
Middle distance
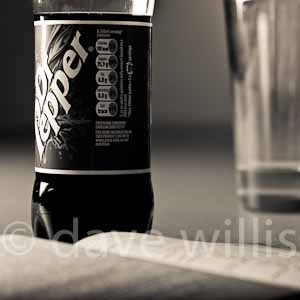 In this photo, the subject is the drink in the middle. The foreground and background elements are just supporting subjects that give some simple context and added interest. The lens is set to 80mm in this shot. Being slightly more telephoto than in the first shot, the available DOF at any aperture will be decreased slightly and that will help us to keep foreground and background out of focus.
The book is placed very close to the camera to ensure that it remains outside of the DOF created around the bottle.
There's another important point to consider here; Because DOF is relative to distance, when we focus on more distant objects we create a larger zone of sharpness and as a guide, 1/3rd of this zone will be in front of the subject and 2/3rds will be behind. So as we focus on objects that are further away from the camera it becomes more important to consider the background elements and keeping them outside of the zone.
To ensure that the glass in the background remains out of focus, we need to move it even further back. If it's too close to the middle object - the bottle - it might be included within the DOF around the bottle and we don't want that to happen.
Background

In this photo, we are focusing on the background element of the shot. In the previous photo, the glass was in the background but it doesn't make a very interesting or bold subject so in this shot the bottle has replaced it.
Focusing on the background brings some more problems because we are shooting over a greater distance. We know that subjects that are further away will have more DOF because of "subject-to-camera" distance. So the challenge is to include foreground elements but keep them out of the zone of sharpness. Fortunately, we also know that most DOF is created behind the subject we focus on, not in front of it.
So as long as we have enough distance between the sharp, background subject and the unsharp foreground we can create a decent differential between the two. If the objects are too close together, the foreground elements will start to appear too sharp and too dominant and we will loose the idea of differential focusing. The easiest way to ensure all the foreground elements stay out of focus is to place them close to the camera, or get up close to them.
OK. Now it's your turn.
Go and see what you can do with differential focusing. Remember that it's not just about short depth of field. It's about context and relating out-of-focus elements to those that we have focused on; it's about making connections between these elements to tell a story, inform the viewer and give the photo more meaning.
Next Week is the final Assignment for level 2 Photography and it's all about flash.
Next Week is the final Assignment for level 2 Photography and it's all about flash.
I find that understanding how focal points work in photography really enhances my images.
ReplyDelete