
The final piece in the “exposure” jigsaw is ISO. What is it and what does it do?
ISO is measure of the cameras sensitivity to light. You may remember it from shooting film, where we sometimes called it “film speed’.
ISO, then:
“The ASA and DIN film speed standards have been combined into the ISO standards since 1974. The current International Standard for measuring the speed of color negative film is ISO 5800:2001[16] (first published in 1979, revised in November 1987) from the International Organization for Standardization (ISO). The determination of ISO speeds with digital still-cameras is described in ISO 12232:2006 (first published in August 1998, revised in April 2006, and corrected in October 2006)”.
Source: Wikipedia, http://en.wikipedia.org/wiki/Film_speed
So now you know!
Seriously though, ISO as it relates to photography, and in this case DSLR’s is a vitally important factor in determining correct exposure and manipulating shutter speeds and aperture values in order to achieve our creative goals.
ISO is a measure of how sensitive or insensitive the camera’s ccd or digital sensor is to light. A high ISO number indicates a high sensitivity and thus the camera needs less light to “see” the photo, whereas a low ISO number indicates low sensitivity, now the camera needs a lot more light to “see” the photo.
High ISO
When shooting film, the ISO is sometimes referred to as “film speed” and a high speed film or fast film is useful for shooting dark subjects, in dark locations or in very low levels of light - indoors or in poor light. Also because the film is “fast” - it reacts to light very quickly - it doesn’t actually need as much exposure in normal levels of light so you can get away with using a much faster shutter speed (to stop action) and/or a smaller aperture (for better depth of field). A lot of sports photographers exploit this by using faster films to shoot action in order to use faster shutter speeds.
The switch to digital cameras carries with it the idea of ISO and fast or slow films, but now the ISO value is a measure of how fast the digital sensor reacts to light. And being an electronic device, we are able to turn the sensor’s sensitivity up or down, higher or lower, and we can do it any time we like. We can shoot frame 1 at 100 ISO, frame 2 at 200 ISO and frame 3 at 400 ISO if we want to. A normal ISO speed for most general photography would be 200 ISO or 400 ISO for a little extra shutter speed.
Film grain & digital noise
So if a high ISO setting is great for getting faster shutter speeds and better depth of field, why don’t we just use a high ISO all the time? Well, like so many things in life, there’s no such thing as a free lunch.
Fast films have the problem of film “grain” in that the higher the ISO, the faster the reaction time of the film emulsion and “grainier” the final image looks. In DSLR’s, the problem isn’t “grain”, it’s electronic noise - leakage currents - that produce noise in the form of speckles, a mozaic-like pattern across the image area and possibly some banding. In simple terms, as you push the sensor to a higher level of sensitivity, the pixels or light gathering areas on the sensor work harder, create more electric current and get hotter - which generates noise. Large sensors (like full frame or FX cameras) handle noise much better than small sensors because of their increased surface area.
Small sensors, like compact cameras struggle with noise issues because their sensors are so much smaller in surface area but full frame DSLR’s are good at using high ISO values these days - they optimize the large surface area of the sensor.
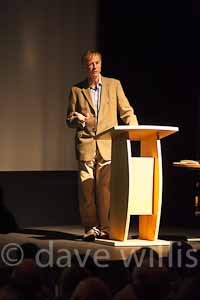
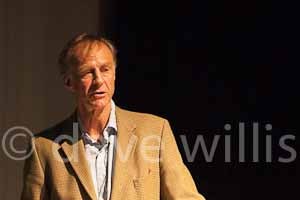
(Above). The photo above is a full frame shot on a Nikon D700 at 6400 ISO. The photo below it is tight crop of just the head and shoulders. Can you see the noise? You can a bit but for 6400 ISO it’s pretty impressive. The D700 is an FX or full frame camera with a big sensor and it’s one of the best cameras available for handling high ISO’s.
Low ISO
We can also dial in a low ISO value - 100 or 200 ISO for example, some cameras can go lower still. Low ISO values are great for keeping the optimum quality of an image by virtually eliminating noise and creating smooth transitions of colour, tone and contrast in the photo. This is exactly what a good landscape or portrait photographer will look for most of the time. Of course, a low ISO setting could mean that in low light levels you might be forced to use a tripod as the shutter speed slows right down, even when the aperture is wide open. Landscape photographers don’t mind this - they nearly always work off a tripod anyway and achieving a slow shutter speed is often an advantage, it enables motion blur in things like waterfalls, rivers, the sea rushing in and out on the beach, trees in the wind and so on and adds to the creativity of the photograph.
ISO Progression
The standard progression of ISO settings looks like this:
100, 200, 400, 800, 1600, 3200, 6400
It’s neat isn’t it? Do you see how the numbers just double each time?
In fact, as each ISO value doubles we are actually increasing the exposure value by exactly double. 200 ISO will give us twice as much exposure as 100 ISO. 800 ISO is twice as much exposure as 400 ISO but half as much exposure as 1600 ISO.
We’ve come across this idea of “halving” and “doubling” exposure already of course. If you remember, the difference between each full stop of shutter speed is exactly half or double; and the difference between each full stop of aperture value is also half or double.
How do ISO, shutter speeds and apertures work together to achieve correct exposure?
So all three systems, shutter speeds, apertures and ISO all share this common attribute - they all three half or double exposure as you increase or decrease from one full stop to the next.
Let’s see how that might work:
image that you are out on a bright sunny day, taking some photos of a pretty view - average light, average subject. The camera might well tell you that a correct exposure is f8 at 1/250 second if you have your camera set to 200 ISO.
We’ll put that in bold on our chart below:
f2.8 - 1/2000
f4 - 1/1000
f5.6 - 1/500
f8 - 1/250
f11 - 1/125
f16 - 1/60
f22 - 1/30
You’ll see from the table that I’ve drawn, that although you can shoot your picture at f8 at 1/250, by opening up the aperture by one stop (f5.6) and at the same time increasing the shutter speed by one stop (1/500) you can also get a perfect exposure.
Because both aperture and shutter speed half or double exposure, if youdouble one you can halve the other and retain exactly the same exposure value! Except that now you have changed the speed and the depth of field -you have a faster shutter speed (good for stopping action) but a shorter depth of field (good for isolating a subject).
You can carry on through the table and see all the possible combinations of aperture and shutter speed that might be available to you if you were starting with an base exposure of f8 at 1/250. In fact, if you go to the extreme ends of the table you will see that you could opt for f22 - 1/30, great for landscapes using a tripod, you get maximum depth of field and a bit of motion blur to create lovely effects with movement as in waterfalls etc. Or, you could use f2.8 at 1/2000 second, great for portraits using minimum depth of field to blur the background, or for sports action where the fast shutter speed would freeze the action and the short depth of field would isolate the subject.
For any given lighting situation there will be a table of possible combinations that you could build, just like this one, that will show all the possible combinations of shutter speed and aperture that you could use - you just have to select which one suits your purpose the best.
But this is just the table we could build at 200 ISO.
What if we alter the ISO by 1 stop to 400 ISO? Or 2 stops to 800 ISO?
OK, in which case instead of f8 at 1/250 the correct exposure would be f8 at 1/500 because increasing the ISO by 1 stop doubles the exposure, in other words over-exposes by 1 stop and in order to get it back to where it should be we have to increase the shutter speed to halve the exposure by the same amount, 1 stop.
200 ISO 400 ISO 800 ISO
f2.8 - 1/2000 f2.8 - 1/4000 f2.8 - 1/8000
f4 - 1/1000 f4 - 1/2000 f4 - 1/4000
f5.6 - 1/500 f5.6 - 1/1000 f5.6 - 1/2000
f8 - 1/250 f8 - 1/500 f8 - 1/1000
f11 - 1/125 f11 - 1/250 f11 - 1/500
f16 - 1/60 f16 - 1/125 f16 - 1/250
f22 - 1/3 f22 - 1/60 f22 - 1/125
Or we could compensate by altering the aperture rather than the shutter speeds, in which case;
f8 - 1/250 at 200 ISO becomes f11 at 1/250 at 400 ISO or f16 at 1/250 at800 ISO.
So exposure is triangle of settings using shutter speeds, apertures and ISO all together to achieve the effect that you want. But remember, high ISO = noise so we tend to keep the ISO values down unless we really need to increase them.
Auto ISO
A great way of managing ISO is to use the cameras Auto ISO setting in the camera’s custom menu or ISO menu. Turning the Auto ISO ON allows the camera to automatically increase the ISO setting whenever the shutter speed looks like dropping below the threshold for camera shake, or a level that you specify in the custom menu. This way, you reduce the risk of camera shake, retain the lowest ISO settings for quality until you really need to change up and the camera does it for you in the background leaving you free to concentrate on your photos. There are times when you will want to take back control of the ISO settings of course, using flash would be one, or when you see the auto ISO setting a very high ISO value that you don’t want to use, so you need to keep an eye on what ISO value is actually being used by the camera all the time - after a while this becomes second nature.
No comments:
Post a Comment