Week 6: White Balance
The white balance control on the camera is designed to calibrate the camera’s exposure system to capture images that display natural colours under different lighting conditions.
Think of white balance as a way of making sure that a sheet of white paper actually looks white in your photo.
What is daylight?
Daylight is actually a mix of three different light sources. Sunlight is essentially warm, yellow light but it’s not the only light we see. Skylight is the light that bounces off ouratmosphere, our sky if you like. And light also bounces off objects and surfaces on the ground. If those surfaces have a strong colour they will affect the colour of the light they reflect, so we havereflected light as well. So daylight is a mixture of sunlight, skylight and reflected light - which combine to alter the colour of daylight in a variety of ways.

Why is the sky blue?
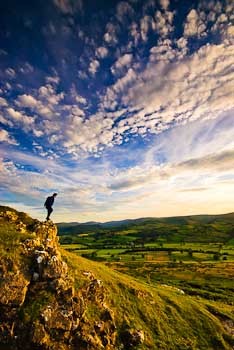
In the middle of the day, with the sun high in the sky, daylight is quite blue. Some people think that the sky is blue because it’s reflecting all the sea on the planet. That’s not right, the sea is blue because it reflects the sky.
This is from http://www.sciencemadesimple.com/sky_blue.html
“The blue color of the sky is due to Rayleigh scattering. As light moves through the atmosphere, most of the longer wavelengths pass straight through. Little of the red, orange and yellow light is affected by the air.
However, much of the shorter wavelength light is absorbed by the gas molecules. The absorbed blue light is then radiated in different directions. It gets scattered all around the sky. Whichever direction you look, some of this scattered blue light reaches you. Since you see the blue light from everywhere overhead, the sky looks blue”.
Since so much of the daylight we see includes skylight, our sheet of paper is being lit essentially by “blue Light”. And although we see what we refer to as “natural colour” under a variety of different light sources, and we see a sheet of white paper under different colours of light, we always seem to see it as“white”.
Of course we’ve evolved with a visual system that is specifically designed to deal with seeing the world in this way and it’s very good at it. Our visual system “filters” out colour casts and always tries to present the world to us with”natural colours”, where white always looks white, whatever the light colour. But a camera can’t do this.
The Kelvin scale
The Kelvin scale is used to describe colour temperature. Orange light, such as you might get from a candle, has a low kelvin temperature - about 2000K; yellow light from incandescent, tungsten, household bulbs is about 3000K. As the light colour becomes increasingly blue and then white, the colour temperature goes up. It can go as high as 11000K for white light. Seems odd, that blue should be a higher colour temperature than orange but remember, a blue flame is much hotter than an orange one and we describe extreme temperatures as “white hot”. Normal daylight, under a bright sun at midday is about 5500K - quite blue.
White balance in photography
In order for the camera (or a RAW converter) to process colour information, it has to know what colour the light source is. This is what the white balance control does. If you shoot under daylight conditions the camera will render colours as naturally as possible using a starting point of around 5500K (kelvin) as the light source.
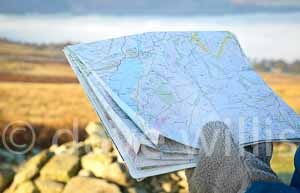
Daylight white balance under daylight conditions (5500k)

Tungsten white balance under daylight conditions (2500k)
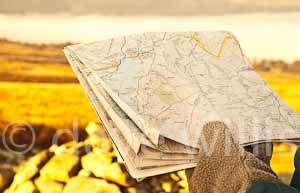
Custom white balance turned up to around 10,000k
But what happens if the light source is not daylight? What if the light source is tungsten bulbs, or flourescent tubes or sodium flood lights? If the camera is only calibrated to produce accurate colours at 5500k it will get colours hopelessly wrong under these different coloured lighting conditions.
The white balance control allows you to calibrate the camera for all kinds of different lighting conditions. Typically, a digital SLR camera will offer you a range of adjustments.
Examples:
In the following examples i shot a “snap” of a window lit by daylight. The lighting was drab, overcast and grey. Let’s see what happens when when we try all the different white balance settings on the camera. Look in particular at how the colour balance of the background greenery changes.
1. WB: Sunny

2. WB: Cloudy

3. WB: Shade

4. WB: Incandescent (tungsten)

5. WB: Fluorescent ( often several options)

6. WB: Flash

7. WB: Auto White Balance (AW)

If you recognise the kind of lighting you are shooting under you can dial in the appropriate white balance setting, allowing the camera to filter out colour casts and warm up or cool down the photos ambient colour balance. Actually the best setting to use most of the time is the AW Auto white balance mode, because modern cameras are so good at detecting and compensating for colour imbalance.
Looking at these examples above, the AW auto white balance did the best job of selecting a neutral setting. But that’s not the full story. Sometimes, we don’t want a neutral white balance. It may be empirically “correct”, but often we prefer our photos to have a certain look, often a little warmer, particularly for landscape and portrait subjects.
Here’s a landscape subject. The white balance for this subject is “correct”. The grey tones are neutral and the image looks cold because it’s a cold, grey day.
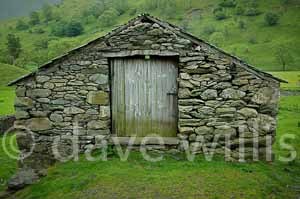
Here’s the same shot with the white balance adjusted to warm up the look of the photo. I set the white balance to cloudy to get a warmer look.
Which one do you prefer? I think most people would choose the second, warmer version. It’s not “correct” but it looks better.
White balance with jpeg and RAW.
One important consideration with respect to white balance is whether you are shooting in jpeg or RAW file format. RAW shooters have a big advantage because RAW files are not processed by the camera but on the computer after downloading, using RAW converter software like Adobe Lightroom, Adobe Camera RAW (ACR) or Apple Aperture or even the RAW software that came with your camera. Because the RAW files are unprocessed, no colour attributes have yet been fixed to the files. You can set the white balance - which is after all just a baseline calibration - at any point you like and change it at will using the RAW processing software. But a jpeg file has to be processed in the camera before it can be compressed and saved to the camera’s memory card.
So with a jpeg, ideally the white balance should be fixed at the point when you shoot the picture. You should try to assess the white balance result when you are shooting and make appropriate changes if the Auto white balance isn’t getting it right. It is perfectly possible to change the white balance of a jpeg file after it has been downloaded but it can be problematic. Generally speaking it’s difficult to re-process jpegs as accurately as you can with RAW files and trying to do so can lead to image artifacts and a degraded file. You have to remember that with a jpeg, you are working with a pre-processed file that only contains 256 levels of tone (an 8 bit file) and any additional tonal information that might have been contained in the original RAW data has been deleted when the camera compressed and saved the jpeg.
In short, a jpeg file is designed to be used right out of the camera and is not meant to be messed with or re-processed on the computer. You can do it, many people do, but it often leads to worse quality image file rather than better.
No comments:
Post a Comment