
The camera has two ways of controlling exposure. It has apertures and it has shutter speeds.
So the shutter speeds can act as a simple variable system for controlling exposure by adjusting the timing of the exposure - more time for dark subjects in low light, less time for bright subjects in bright light. But there’s more to it than that…
For one thing, the amount of time the shutter stays open has a direct influence on how movement and motion is captured and displayed in a photograph.
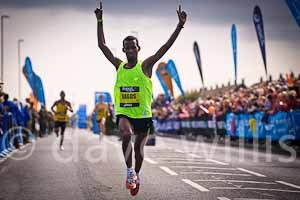
 Clearly, the first photo of the elite athletes finishing the Great North Run has used a fast shutter speed to freeze the action and render the moment when this athlete crosses the finish line in sharp detail. We can study it, see his expression and maybe empathize with the joy of the moment.
The second photo has an entirely different look. The slow shutter speed and camera panning motion has rendered the subject as a blur of motion and action. This is far more “impressionistic” than the first photo - this is more about how running might “feel” to the athlete and less about capturing a unique moment.
So, shutter speeds - the choice over whether to freeze action or show movement, is a powerful creative tool for the photographer and this is what shutter speeds are really all about.
Shutter Speed Progression
Before we go any further, let’s learn our standard progression of full shutter speed values, or “stops”.
1/8000, 1/4000, 1/2000, 1/1000, 1/500, 1/250, 1/125, 1/60, 1/30, 1/15, 1/8, 1/4, 1/2, 1 sec, 2 sec, 4 sec, etc to 30 seconds plus B ("bulb" - timed exposure) and X (sync speed for flash).
Each full stop of shutter speed either halves or doubles the exposure; so 1/250 second is twice as much exposure as 1/500 second but half as much exposure as 1/125 second. That's important. Remember it, learn it. I'll say it again; each full stop of shutter speed halves or doubles the exposure. That's just like apertures - they do the same thing - half and double exposure as you move between one stop of aperture and the next. We’ll come back to the relationship between apertures and shutter speeds when we look at ISO in a later installment.
How do shutter speeds work?
It seems obvious, intuitive really how shutter speeds work but do we really understand the implications? Let’s state the obvious - if you use a really fast shutter speed it freezes or stops any action, motion or movement. OK, but how does it do that? Well, suppose you are photographing a passing cyclist. Count to 10 slowly - how far did the cycle move during that “10 second” exposure? Probably almost out of sight. If you were photographing that cycle with a 10 second exposure it would appear as a constantly moving impression on the camera - in other words a blur. In fact if the subject is moving fairly rapidly and we use a very slow shutter speed, the subject is never in one place within the frame for long enough for the camera to build up any kind of impression of it at all so it will all but disappear!
On the other hand, how far can it move across the frame in say, 1/1000th second? Not far. What about 1/4000th second - even less distance, in fact relative to your camera position it will hardly have moved at all - maybe just a fraction of an inch. So in relative terms it is static, stationary, not moving at all! Hence, your fast shutter speed has “stopped” the subject. And the faster the shutter speed, the more successfully it will “freeze” the action.
Speed is relative to distance.
This ability of shutter speeds to either “blur” or “freeze” movement is relative to how close the subject is to the camera. You can try a simple experiment to prove this. Pass your hand across your face, just in front of your eyes. Did that look very fast and very blurred to you? I’m sure it did. Now do the same thing at arms length, moving your hand at the same speed. Did that look a lot slower and lot clearer to you? Of course it did.
Objects close to the lens (or your eyes) seem to travel faster than objects further away. You can use that information to help you photograph motion and speed.
- To increase motion blur get closer to the subject, which often means using a wider lens.
- To reduce motion blur or increase your chances of freezing the action get further away using a telephoto lens to fill the frame.
If you notice the two running photos again - that’s exactly what I have done.
Camera Shake
The final word must go to “camera shake”.
Camera shake is the single biggest cause of failed photos - or so they say. When students first start out using a camera they tend to forget to keep an eye on the camera settings. One of the first things to go wrong is when they point the camera at a dark subject (black cat sitting on a black chair!) or they move from a well lit area to a dimly one (indoors) The shutter speed will fall in order for the camera to still make a good exposure. If the shutter speed falls below a certain speed you will get camera shake - in other words the camera will record the movement of you hand-holding the camera and your photos will appear blurred.
Sometimes camera shake is obvious - the photo is very blurred and you can tell the up-and-down motion is caused by someone holding the camera at a very slow shutter speed. But other times the shutter speed has fallen just a little and the effects of camera shake are not seen until you enlarge the photo either as print or on your monitor. Then you realise that the subject is “soft”. Not crisp and really sharp. You are disappointed because you thought you had a great shot!
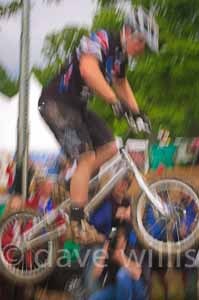
Here’s a shot with lots of camera shake (left). If you were feeling generous you might say it has a certain “impressionistic” quality, but really it’s camera shake!
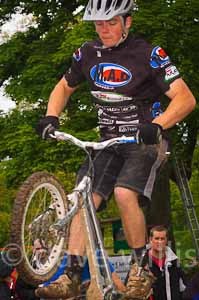
And here’s a similar subject shot with a much faster shutter speed (right) which has eliminated the camera shake and captured a nice sharp image.
The right shutter speed for the right lens.
There’s no single shutter speed that will eliminate camera shake for every lens, not until you get up to the really fast speeds, 1/1000th second and beyond. It depends what lens focal length you are using. Long (telephoto) lenses need a much faster minimum shutter speed to avoid camera shake than shorter, wide angle lenses.
A rule of thumb, the "reciprocal rule" actually, states that you should never use a shutter speed less than the reciprocal focal length of the lens you are using. In other words, if you are shooting a 50mm lens, don’t try to hand-hold a shutter speed of less than 1/50th second, use a tripod or camera support if you have to; better still find a way to increase the shutter speed (try increasing the ISO). Same thing with a 200mm lens - 1/200th second is your minimum safe hand-holding speed.
Why the difference? Well, a big telephoto lens is longer (more leverage), heavier (more weight to hold still) and it “magnifies” the image and in so doing it also “magnifies” any movement you make whilst holding it. Try focusing a powerful pair of binoculars and you’ll see what I mean, they are incredibly hard to focus unless you use some sort of support to steady your elbows. All that "shake" is the binoculars “magnifying” your body movement.
Using shutter priority mode to choose shutter speeds.
OK, that will do for shutter speeds. Go play with them. You have that shutter priority mode on your dslr camera, so you can use that to try out different shutter speed effects. The camera will try to match an appropriate aperture (f stop) to the shutter speed you choose. As long as you don't set a speed that's too high or too low for the light conditions the camera will sort out exposure for you. If you do set a shutter speed that the camera can't match an aperture to, it will let you know, by displaying an error message in the viewfinder; either "hi" for over exposed or "lo" for under exposed. If you get that, you'll have to re-adjust your shutter speed until the camera can find an aperture that will work.
Experiment. Practice with different subjects, moving at different speeds. Stop fast action, get it pin sharp and then blur motion, get it really blurred. See what affect you can produce. And have fun.

No comments:
Post a Comment