Modern film and digital camera’s use three basic ways of measuring and controlling flash exposure so let’s have a look at them in turn.
Flash exposure control:
The first thing to remember about flash is that flash exposure is controlled byISO and aperture in the camera, not shutter speed. The only affect that shutter speed has is on the ambient (natural or continuous light) exposure and of course with flash sync. Why is this?
Because flash duration is so short that shutter speed makes no real difference to how much of the flash light is captured by the camera. Flash duration is normally between 1/1000 and 1/30,000 of a second, depending on flash power and your camera can’t sync at those speeds (unless you have a high speed flash mode but that works a bit differently anyway), so at normal sync speeds of up to 1/250 second the flash is over before the shutter has even closed, hence shutter speed can’t control flash exposure.
1: Manual flash mode
Most modern flash guns have a manual mode and as we shall see later on, when using flash off-camera, this can be a very useful feature. In manual mode, the flashgun is operating totally independent of the camera, just like a studio flash. The amount of flash light put out by the flash unit is controlled by the photographer selecting a power setting, which typically will vary from full power (1/1) to 1/2, 1/4, 1/8 and so on right down to maybe 1/64th power or less depending on the flash design. The only way of gauging the correct output for the flash is by testing the exposure.
Set an appropriate/”guestimate” power setting on the flash and an aperture/ISO combination on the camera and test it. Shutter speed will be whatever works best for any ambient light there is. If it’s too light, reduce power or decrease aperture (or ISO or both) if it’s too dark increase power or open the aperture and/or increase ISO.
Or if you are shooting film, use a flash meter or calculate flash distance and power using guide numbers - but honestly does anyone do this these days?
Of course, if you change any of the camera settings, or move the flash to a different flash-subject distance, the flash power will need to be altered to a new setting, so it’s not a suitable mode for fast changing or moving situations.
2: Auto flash mode
The Auto mode is designed to be more flexible and give us a degree of automatic flash exposure in changing situations. The flash is not directly controlled by the camera but rather it has a built-in light sensor on the front panel that can detect flash reflected by the subject. The sensor cuts the flash power when enough flash has lit the subject for a good exposure.
In order to do this accurately, the flash needs two bits of information from the photographer. It needs to know the ISO you are using, since high ISO’s need less exposure and it needs to know the aperture (f-stop) you have set. With this information the flash sensor can control the flash output appropriate for the reflective properties of the subject.
A dark subject (which reflects less light) can be given more flash and a light subject (which reflects more light) gets less flash. The system can be customised easily too - if you dial in f5.6 on the flash but use f8 on the camera, the flash will give 1 stop less power than you really need so you will have fill-in flash. If you dial in f8 on the flash but use f5.6 on the camera the opposite will happen, the flash will give you 1 stop more power than you need - over-exposure.
Is the system fool-proof? No. Since the correct flash exposure is dependent on the flash sensor correctly “seeing” the flash reflected from the subject, if the subject moves, you can get an unknown reflective quantity; if you change the camera settings but forget to update the flash settings your flash exposures will be wrong and if you shoot subjects with unusual or variable reflective properties the results can be unpredictable.
3: TTL flash mode (iTTL/ eTTL/pTTL and so on)
The third and most dependable flash exposure system is TTL or Through The Lens. In this system the flash exposure is measured off the actual camera sensor or film plane by an internal flash sensor built into the camera body. Since the flash sensor is measuring the flash actually falling on the sensor or film, the system is very accurate and takes account of all the variables including lens absorption, filters and so on. All the camera has to do is tell the flash when to start and when to stop.
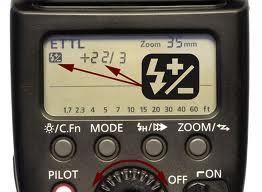
The flash is easy to adjust too. There is normally a plus/minus +/- button or control for flash exposure compensation on the back of the flash and also on the camera. Dedicated flash guns connected to the camera can be controlled using either the flash +/- control for more or less power, or the camera mounted +/-, or in fact a combination of the two if you like!
However, in order to work, the flash has to be “dedicated” to the camera - in other words built to work directly with camera it’s being used with - and the camera has to be able to communicate with the flashgun. Nikon, Canon, Sony, Pentax, Olympus and others all have their own dedicated TTL systems with features and functions, and cute names like iTTL (Nikon) and eTTL (Canon)
Using the flash off-camera
Because the camera and flash are dedicated together and linked via the hotshoe contacts, all the exposure information of f-stop and ISO can be passed directly to the flash. This is no problem when the flash is hotshoe mounted but presents problems with off-camera use. If the flash is tethered to the camera using a dedicated cable, the information can be transmitted easily but if the flash is going to be used remotely off-camera, some other way of communicating must be used.

Nikon and Canon both use an encoded visible-light pre-flash system using a master “sender” flash (often the pop-up flash) and slave receiver flashes. These systems work well in low ambient light or in the studio but can be unreliable in bright ambient light where the flash signals can be overwhelmed by the existing light.

The slave flash’s light sensor, which is mounted on either the side of the camera (above) or the front plate (Canon) also needs to be pointed ‘line-of-sight” towards the sender flash, mounted on the camera which is inconvenient in some situations.
This is where “wireless triggers” come in which we will look at in a separate article.
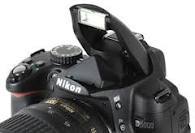
Built in pop-up flash
So, now that we have reviewed the basics of flash exposure, let’s have a closer look at the little pop-up flash gun built into your camera.

Most pop-up flash guns are triggered automatically by the camera in Auto mode but must be turned on in P (program) mode and all other modes. In Auto mode, the camera will turn on the flash whenever the meter senses that the ambient light level is too low to achieve a reasonable shutter speed that you can hand-hold without getting camera shake.
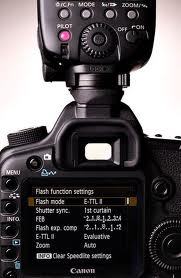
Dedicated flash
Because the flash is built-in, it is fully dedicated. In other words, the camera can controll it’s output by metering exactly how much flash is required and it can control all the functions via the camera controls.
Once the flash is on, you can select what kind of flash mode you want to use via the flash mode button. There’s a number of options so we should go through them and explain each one:
Flash Modes on the camera

We can usually choose between different flash modes on the camera, depending on the circumstances and the kind of flash we need. Different cameras have their own individual flash modes according to the camera makers design and many modern DSLR’s have integrated many of the flash modes into the auto settings anyway, so you don’t need to set them yourself.
Auto flash
Auto flash just does everything automatically for you but there’s a couple of things worth noting.
First of all, if you use auto ISO, the camera will set the lowest default ISO setting (usually 200 ISO) and keep it there. This will often mean your backgrounds will go black because the camera is not exposing for the ambient light, only the flash light. So turn your ISO to manual and push it up if you want to expose for the ambient light as well.
And second, you don’t have to just accept whatever flash exposure the camera puts out. You have a flash exposure compensation dial on the camera (FEC). This allows you to over-ride whatever flash power the camera is setting and dial in either minus (less) power or plus (more) power, according to your needs.
Red eye reduction
This will help you reduce the effect of “red eye’ in portraits taken with the pop-up flash. The flash fires a series of rapid pre-flashes to force the portraits pupils to constrict (because you just blinded them with a strobe!). This means less flash penetrates the eye and you reduce red-eye. Often you you can combine red-eye reduction with other modes like slow sync or rear/2nd curtain mode. Hint - only turn it on when you really need it! Red eye reduction is usually found in the flash menu.
Slow speed sync.
On some cameras (Nikon’s in particular) you are able to set a flash mode called Slow Speed sync. In this mode, the camera is able to use a slow shutter speed to record the ambient light along with the flash to light the main subject. Canon cameras often incorporate this into the normal auto mode so you don’t have to set yourself - see your camera manual for help.
On my Nikon d5100, when I pop up the flash and go through the various shooting modes, this is what I get…
Auto flash in:
Manual - I can set any shutter speed/aperture combo I like up to 1/200th which is the camera sync speed.
Aperture priority - the camera will use any shutter speed up to 1/200th. I can set any aperture I like.
Shutter priority - I can set any shutter I like up to 1/200th which is the sync speed The aperture will be set by the camera according to the ambient light level.
P Mode - The shutter will default to speeds between 1/60th and 1/200th which will often result in a black background.
Auto - The same thing, I get speeds between 1/60th and 1/200th with black backgrounds in low light levels.
So, I can only expose for the ambient light, ie the background, when using my pop-up flash if I use the manual, shutter or aperture priority modes. In all other modes, my shutter speed is restricted to speeds that will render thesubject fine with the flash but the background as either underexposed or black. This is not good. However, the Slow Speed Sync flash mode over-rides this and allows you have much slower shutter speeds in these shooting modes so you get to expose for the background ambient light as well.
Using a pop-up flash
Fig 1. Program mode/Auto flash - I get good flash exposure but a black background,yuk!

Fig 2. Program mode/Slow speed sync flash mode - that’s better, now I get some ambient light and create a nice atmosphere, I can see the background. However, there’s a problem you have to watch out for. The shutter speed needed to be around 1.5 seconds to record the dim background lighting, so that means using a tripod, otherwise I’m going to get camera shake.

Fig 3: If I don’t use a tripod with slow speed sync, I record all the movement of holding the camera…

Slow speed sync for effect
Slow speed sync with camera shake - or motion blur isn’t always a bad thing. In fact, photographers use it all the time…

Photographers use slow speed sync to inject motion, ambience and atmosphere into their flash pictures to bring them alive. The slow shutter speed creates motion and blur whilst the flash, being bright and fast, creates a sharp image over the top. Try it with party pictures, you will be amazed how effective it is. Different shutter speeds create different amounts of motion blur and will control how light or dark your backgrounds appear.
Rear/2nd curtain sync
The last flash mode we’re going to talk about is rear curtain or 2nd curtain sync. The idea is that we can choose to fire the flash at either the start of the exposure (the conventional way) or at the end of the exposure (rear/2nd curtain method). What’s the difference between the two? Well, if the flash fires first, and then the ambient exposure continues, any motion blur (as we see above) will appear in front of the sharp subject. That can look odd. We don’t really expect to see “ghost” images projecting in front of the subject, but don’t mind seeing the blur behind the subject. That looks more natural. Here’s an example…

See how all the action (the light trails in this case) appear first and then the runner, caught sharply with the flash is at the end of the exposure. So Rear curtain or second curtain flash creates images that use slow speed sync in a more realistic way. i use it all the time. In fact my cameras are set to slow speed rear curtain sync as the default setting.
Flash Exposure Compensation
Let’s just remind you about flash exposure compensation again, it’s very important.
Being able to set more or less (+/-) flash power means that you can give your pictures just a little pop of flash to brighten up or fill in those shadow areas any time you like. Try shooting a portrait with different amounts of minus flash exposure compensation, starting at -0.3 and going on up to -3 (stops). At -3 stops you shouldn’t see any flash at all!
No comments:
Post a Comment