We're going to start by learning how to drive the dslr camera:
Many camera users (as opposed to photographers) leave their camera in one single mode, Auto mode and don’t get any further than that. Sure, the camera will produce good exposures for you most of the time in the Auto mode but it's no thanks to you. You are locked out of the process, you play no real part in the decision making and when the camera doesn't get you a good result you may not know how to fix it.
But we can change that very easily. The camera modes offer us a variety of ways to shoot pictures, depending on the circumstances, the subjects, the lighting and other factors. Each mode has advantages and disadvantages. Let’s take a look at them.
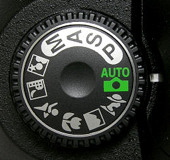
The camera modes are normally found on a rotary dial on the camera top plate.
Full Auto mode or "Green Camera"
I often refer to this as “Green” mode, either green camera or green square or whatever - it mostly comes in the form of a green camera icon like this image above, although some camera makers decide to use red instead - don’t ask me why, something to do with unique selling point’s probably!
Green mode is a good description actually because it’s great for "green" photographers, who aren’t experienced enough to know better. It’s basically point and shoot mode.

By "come out fine" I mean well exposed, rather than individual, purposeful, or fulfilling your creative intention. The camera doesn't know what they are! If you only ever shoot photos of scenes that are well lit, with an even amount of light and dark, lot's of average tones, nothing very extreme, then Auto mode will work fine every time.
But few of us do that and in the Auto mode, the main priority for the camera is just to set a shutter speed that avoids camera shake and an aperture that gets you a reasonable depth of field. On an average sunny day that will be around 1/250 second at f8 on 100ASA. Given the same light conditions, the camera will try to set something like that every time when you're in that in Auto mode.
Disadvantage: You get no say in what settings the camera uses - you are out of the loop and the camera is in control. Great if you have no idea what settings you could or should be using but hopeless if you want to control speed, motion, depth of field and so on. For that, you must take some control over the camera.
So from this point on in Level 2 Photography we are going to ignore Auto mode. It teaches us nothing and prevents us from making purposeful images where we are in control of the settings. Say goodbye to Auto!
P: Program mode
P mode is much more useful. In this mode you can still point and shoot but this time you can make some choices over which settings the camera will use. In P mode you can use the camera’s thumb wheel to scroll through the various combinations of shutter speed and aperture that the camera could use for each situation you point it at.
When you're new to slr cameras this can seem confusing. The camera has both shutter speeds and apertures. Correct exposures are achieved by either setting an aperture (the diaphragm or hole in the lens), and finding a shutter speed to provide the right amount of exposure, or the other way around; set a shutter speed and then find an appropriate aperture to go with it to get a good exposure.
Either way works fine. But there's not just one combination of aperture/shutter speed available - there's many. All of them will produce a good exposure, but the photo might have a different look or feel. Let me give you an example:


As you can see, the two photos of sculling boats look very different, although each looks like a good exposure. By using a slow shutter speed the boat gets a motion-blurred, impressionistic look, whilst using a fast shutter speed freezes the action and produces a more literal, realistic image. Which do you prefer? It's up to you to decide how you want your photos to look. You can be as creative as you like. Taking control of the camera settings allows you to do that.
Do You Understand How Shutter Speeds and Apertures Work Together?
At this point it would make sense for us to make sure we understand how shutter speeds and apertures work together to give us a good exposure. If you don’t really understand this, week 4 will explain it all and help you get a feel for how we decide which combination of f-stop (aperture) and shutter speed would be best for each different situation.
Using P mode
OK, to continue - so in P mode, if you know that you need a fast shutter speed to freeze action, just use the scroll wheel to whizz through to the fastest shutter speed available to your camera for the situation you are pointing it at. And if you know that you would prefer to use a slower speed to create some movement in your image, scroll though the other way to find a slower shutter speed that is available.
Or your priority might be with sharpness throughout your image and you might need to maximise depth of field - no problem - scrolling through the aperture/shutter speed combinations available will soon give you the smallest aperture and vice versa with short depth of field, find the widest aperture and there you go. So now you have some control over the creative direction of your photography - something you didn’t have with Auto Green mode! And that means now you’re acting like a photographer rather than a snap-shooter.
Now onto the two priority modes:
S: Shutter Priority Mode (Tv on a Canon)
A: Aperture Priority Mode (Av on a Canon)
The next two modes are sort of self explanatory. We have two PRIORITY modes. These are shutter priority and aperture priority.
Whenever we decide that our priority is to stop or show motion, we would naturally select Shutter Priority mode because it allows us to select and lock in the shutter speed we would like to use while the camera automatically meters the scene and figures out the correct aperture to go with it.
When we decide that depth of field (the amount of sharpness throughout our photo) is our priority, we can select Aperture Priority as our mode. It works just the opposite - here we select our chosen aperture and let the camera pick a shutter speed to match.
Let’s look at what our priorities are likely to be in photography.
There are four things that we can achieve using the aperture/shutter speed settings on the camera.
 In a shot like this triathlon cycle race, we are prioritising shutter speed, so it makes sense to use Shutter Priority. We set the shutter speed that we want to use and the camera sets the aperture that will give us a good exposure to go with that shutter speed.
This shot uses a slow shutter speed to create motion blur in the background. As the camera pans (tracks) with the speeding cyclist, it renders him relatively sharply against the blurred background. The camera and bike are traveling at the same speed relative to each other with the panning technique so the bike looks sharp.
But the background is whizzing past the moving camera, so comes out blurred with a slow shutter speed. By using flash as well, I can keep even more sharpness in the cyclist. This a good example of how photographers use shutter speeds to influence how the final shot will look.
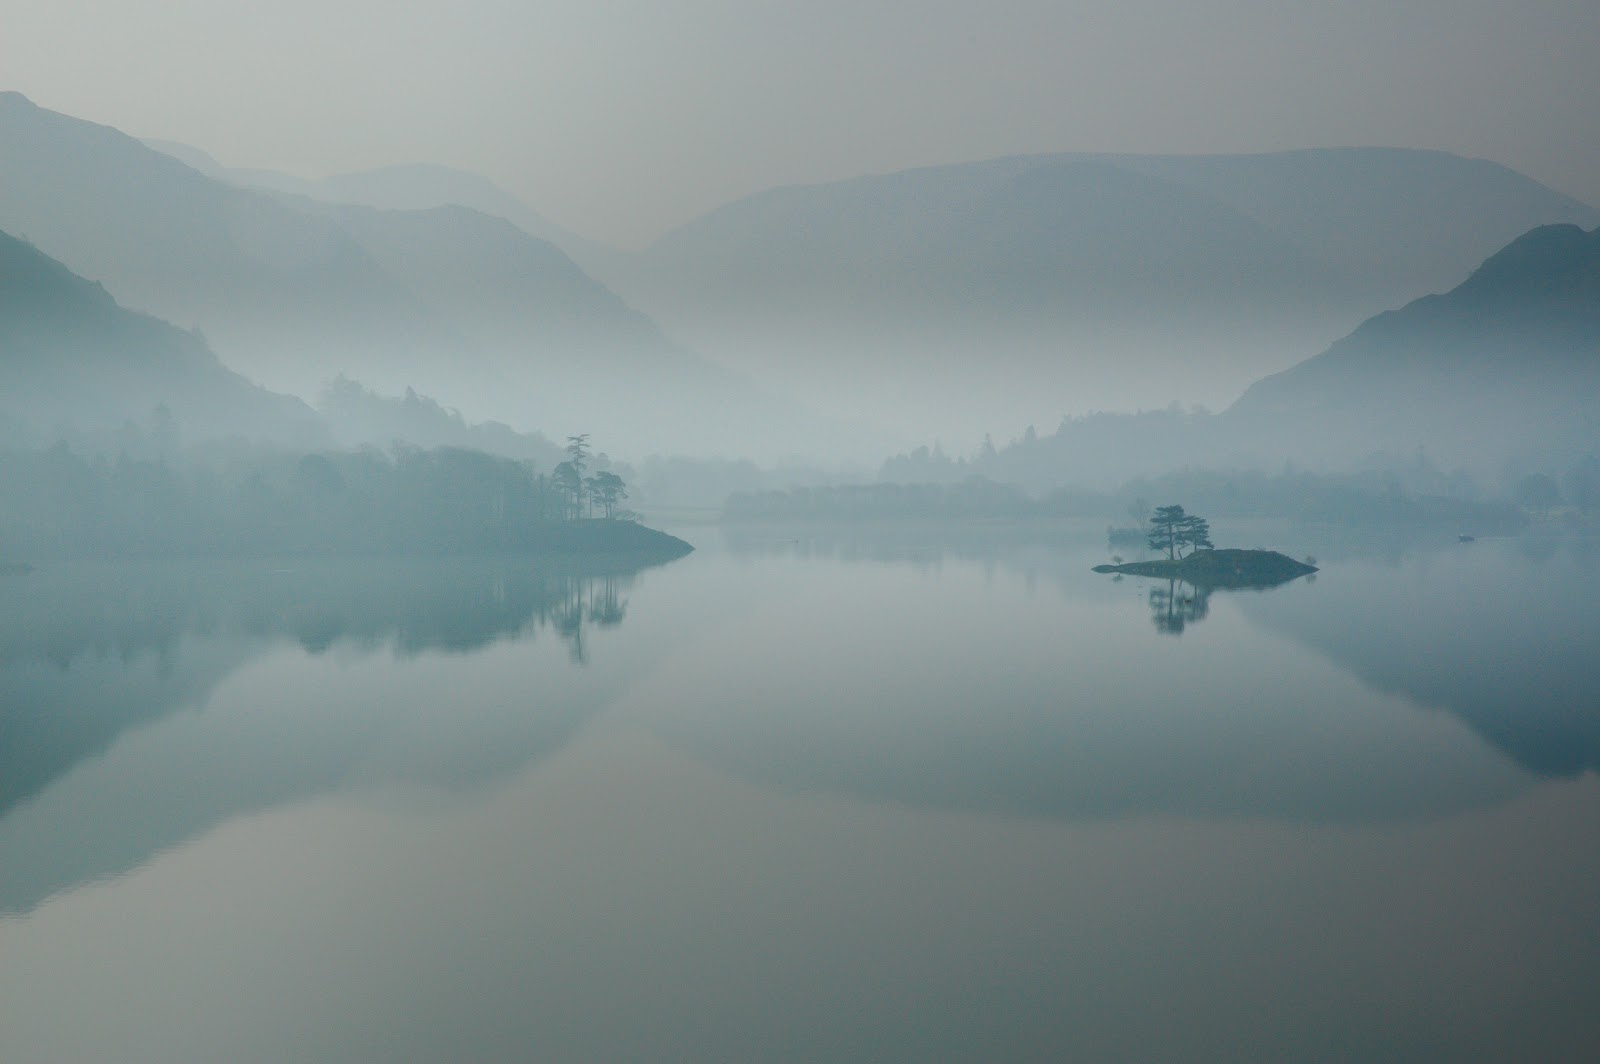
 In this landscape shot we are prioritising depth of field, so it makes sense to use Aperture Priority, where we set the aperture (f-stop) that we want to use and the camera sets the appropriate shutter speed to go with it to give us a good exposure.
Because the priority is to get as much sharpness, from front-to-back of the picture, I used f22 for maximum depth of field and put the camera on a tripod. The tripod was necessary because f22 is a tiny, tiny hole and lets in very little light. So the shutter speed needs to be a long one to build exposure.
Slow shutter speed equals camera shake! Hence the tripod. All landscape photographers know this and so always carry a tripod with them. In landscape photography we don't need to "stop" the subject with a fast shutter speed - the mountain isn't going to run away from us.
So the priority modes give us a fast and convenient way to grab the setting that we want and let the camera figure out the other setting to go with it.
Aperture Priority mode is the most popular because...
Incidentally, many photographers use Aperture Priority almost all the time because it allows them to control all the settings easily from one mode. Use a wide aperture and you get small depth of field and fast shutter speed. Use a small aperture and you get big depth of field and slow shutter speed.
That's all your requirements taken care of from one camera mode - well nearly anyway. And because the camera has a huge range of shutter speeds that it could choose from, everything from 1/8000th second down to 30 seconds, it will always be able to find a shutter speed to match whatever f-stop you have selected.
This is not the case in Shutter priority - here you can select a certain shutter speed but the camera only has a limited range of apertures to choose from and it may not find one that will match your chosen shutter speed and still give a good exposure. Hence, Aperture Priority is a more popular choice.
That's not to say that Shutter priority is no use - far from it. There are times when we definitely want to lock in a particular shutter speed and keep it locked in, allowing the aperture to vary to our exposures good. I'll post some example pix here soon, but here's an example that comes to mind - aircraft propellers! Turbo props only look good in photos at certain shutter speeds. If you shoot a fast speed the prop freezes and the plane looks static - no good at all. Shoot too slow and the spinning prop "disappears" - that's no good either. You have to shoot them at just the right speed. Shutter priority!
M - Manual Mode
In Manual mode we are taking full control, auto pilot off, you have the conn!
This means that you have to use the cameras built-in TTL (through the lens) light meter to work out exposures. This is fairly easy to do actually.
When you switch to manual mode, you will notice a bar chart of sorts - the TTL camera meter - in the viewfinder and also on the top plate and maybe also on the camera monitor. The meter says + at one end and - at the other. Plus is over exposed and minus is under exposed. You will also notice a cursor that moves up and down the scale indicating if your exposure of the scene is over, under or bang on! So, reading the meter is easy.
Using manual mode is a bit like using a priority mode. In shutter priority, you set the shutter speed and the camera measures the light reading and works out which aperture to use to give a good exposure for the scene. Well, in manual you do a similar thing - you first decide which is your priority - Shutter or Aperture? Set the one that you want to use. Now use the meter to find the other setting.
So if you set f8 on a bright sunny day at the beach you might well find that the appropriate shutter speed to go with that would be around 1/250 second (at 100 ISO) - twirling the shutter speed dial and watching the cursor on the meter will soon get you to the right shutter speed.
Next week we'll look at Shutter Priority.
The next two modes are sort of self explanatory. We have two PRIORITY modes. These are shutter priority and aperture priority.
Whenever we decide that our priority is to stop or show motion, we would naturally select Shutter Priority mode because it allows us to select and lock in the shutter speed we would like to use while the camera automatically meters the scene and figures out the correct aperture to go with it.
When we decide that depth of field (the amount of sharpness throughout our photo) is our priority, we can select Aperture Priority as our mode. It works just the opposite - here we select our chosen aperture and let the camera pick a shutter speed to match.
Let’s look at what our priorities are likely to be in photography.
There are four things that we can achieve using the aperture/shutter speed settings on the camera.
- We can set a high shutter speed to FREEZE (stop) movement.
- We can set a slow shutter speed to SHOW (blur) movement.
- We can use a wide (large) aperture to MINIMIZE Depth of Field (f2.8 for example).
- We can use a narrow (small) aperture to MAXIMIZE Depth of Field (f22 for example).
 In a shot like this triathlon cycle race, we are prioritising shutter speed, so it makes sense to use Shutter Priority. We set the shutter speed that we want to use and the camera sets the aperture that will give us a good exposure to go with that shutter speed.
This shot uses a slow shutter speed to create motion blur in the background. As the camera pans (tracks) with the speeding cyclist, it renders him relatively sharply against the blurred background. The camera and bike are traveling at the same speed relative to each other with the panning technique so the bike looks sharp.
But the background is whizzing past the moving camera, so comes out blurred with a slow shutter speed. By using flash as well, I can keep even more sharpness in the cyclist. This a good example of how photographers use shutter speeds to influence how the final shot will look.
Because the priority is to get as much sharpness, from front-to-back of the picture, I used f22 for maximum depth of field and put the camera on a tripod. The tripod was necessary because f22 is a tiny, tiny hole and lets in very little light. So the shutter speed needs to be a long one to build exposure.
Slow shutter speed equals camera shake! Hence the tripod. All landscape photographers know this and so always carry a tripod with them. In landscape photography we don't need to "stop" the subject with a fast shutter speed - the mountain isn't going to run away from us.
So the priority modes give us a fast and convenient way to grab the setting that we want and let the camera figure out the other setting to go with it.
Aperture Priority mode is the most popular because...
Incidentally, many photographers use Aperture Priority almost all the time because it allows them to control all the settings easily from one mode. Use a wide aperture and you get small depth of field and fast shutter speed. Use a small aperture and you get big depth of field and slow shutter speed.
That's all your requirements taken care of from one camera mode - well nearly anyway. And because the camera has a huge range of shutter speeds that it could choose from, everything from 1/8000th second down to 30 seconds, it will always be able to find a shutter speed to match whatever f-stop you have selected.
This is not the case in Shutter priority - here you can select a certain shutter speed but the camera only has a limited range of apertures to choose from and it may not find one that will match your chosen shutter speed and still give a good exposure. Hence, Aperture Priority is a more popular choice.
That's not to say that Shutter priority is no use - far from it. There are times when we definitely want to lock in a particular shutter speed and keep it locked in, allowing the aperture to vary to our exposures good. I'll post some example pix here soon, but here's an example that comes to mind - aircraft propellers! Turbo props only look good in photos at certain shutter speeds. If you shoot a fast speed the prop freezes and the plane looks static - no good at all. Shoot too slow and the spinning prop "disappears" - that's no good either. You have to shoot them at just the right speed. Shutter priority!
M - Manual Mode
In Manual mode we are taking full control, auto pilot off, you have the conn!
This means that you have to use the cameras built-in TTL (through the lens) light meter to work out exposures. This is fairly easy to do actually.
When you switch to manual mode, you will notice a bar chart of sorts - the TTL camera meter - in the viewfinder and also on the top plate and maybe also on the camera monitor. The meter says + at one end and - at the other. Plus is over exposed and minus is under exposed. You will also notice a cursor that moves up and down the scale indicating if your exposure of the scene is over, under or bang on! So, reading the meter is easy.
Using manual mode is a bit like using a priority mode. In shutter priority, you set the shutter speed and the camera measures the light reading and works out which aperture to use to give a good exposure for the scene. Well, in manual you do a similar thing - you first decide which is your priority - Shutter or Aperture? Set the one that you want to use. Now use the meter to find the other setting.
So if you set f8 on a bright sunny day at the beach you might well find that the appropriate shutter speed to go with that would be around 1/250 second (at 100 ISO) - twirling the shutter speed dial and watching the cursor on the meter will soon get you to the right shutter speed.
Next week we'll look at Shutter Priority.
Being a former student of Dave Willis I can highly recommend his course. He is a great photographer and a really good teacher.
ReplyDelete