Here it is, the first assignment. It's pretty easy really. Won't take too much time. All you have to do is research, plan, test and shoot two photographs. The first will be "creative use of a fast shutter speed" and the second will be, you guessed it, "creative use of a slow shutter speed". By "creative use" I mean thinking up a shot that really uses the attributes and benefits of shutter speeds to create a picture that looks great.
If you're using a fast shutter speed, what would look amazing frozen in a moment of time, seen as only a fast shutter speed, still image can show it? And with a slow shutter speed, what can you do with motion blur and timed exposures that will give us a unique view of the world that is different from our normal visual experience? Because that's what shutter speeds do for us in photography. They allow us to capture images that offer a view of the world that is uniquely different from our normal vision. That is their power. Go to it.
1. Aim of the assignment
The aim of this assignment is to allow students to experiment and learn about the techniques of using different shutter speeds as a creative tool to control movement. Variable shutter speeds allow the photographer to make creative decisions about how the final image will look with regards to movement. Slow shutter speeds allow us to create the impression of movement whilst fast shutter speeds allow us to freeze movement and preserve detail or capture a moment of time. We are also able to combine elements of both techniques through the use of panning technique where the camera follows the subject and renders it sharp whilst still using a slow shutter speed, which renders the static background as a blur.
 Your Task:
Your task is going to be to produce two photographs that demonstrate the effective and creative use of shutter speeds. The important point there is "creative use". It's easy enough to set a fast and slow shutter speed on your camera and shoot away but so what? That doesn't make your photos creative or useful or unique in any way. The trick is to consider whether the subject will benefit through using the shutter speed in a creative way. It will, if it has movement. Static subjects don't care about shutter speed. They look the same at 1/1000 second as they do at 1 second. Moving subjects however look completely different at these speeds. So being creative with shutter speeds demands subjects that have plenty of movement and your job is going to be to decide how best to treat the subject - fast to freeze movement or slow to show motion.
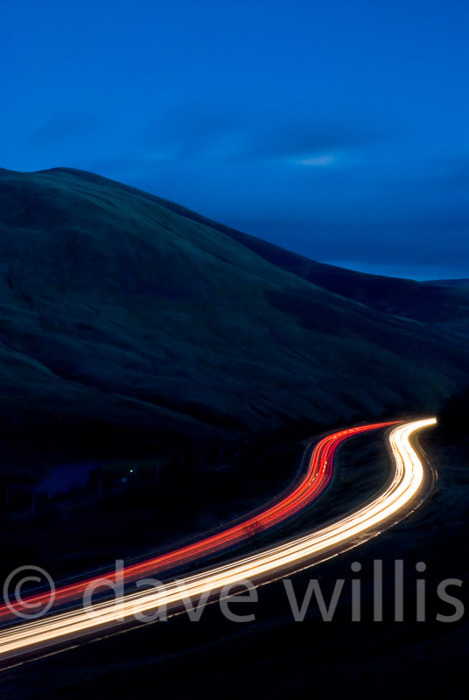
Here's two photos that use a slow shutter speed to create or enhance movement. The light trails take the idea of movement and turn it into something that would not otherwise be visible to the eye. I shot this shortly after sunset on a hill overlooking the M6 in Cumbria, where there was a curve in the road to create a more interesting shape. The shutter speed was about 30 seconds but I only figured that out through test shots - which took about 5 minutes to do. The key with picture like this is not to wait until dark but start shooting shortly after sunset when there's still some light in the sky. Otherwise you get no background ambient light and the sky goes black - which is boring.
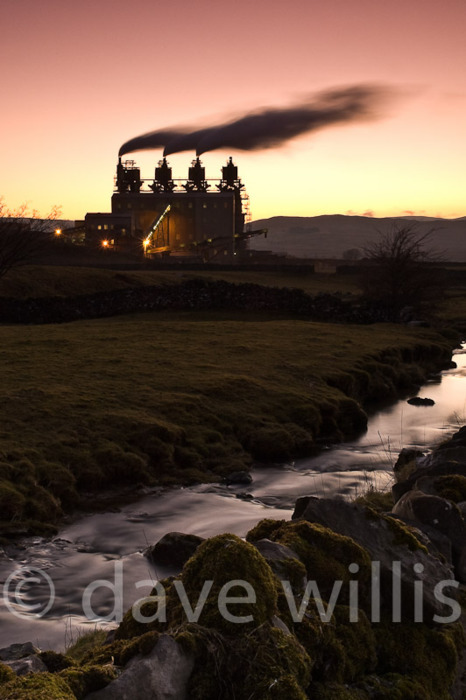 The factory chimneys was also a bit experimental. I didn't know what to expect but the wind was fairly strong so I had a good idea that the smoke would produce a decent blur. Putting the little stream in the foreground added another element of movement and also a contrasting reflected light to add some interest and colour. Seems to work OK.
So:
Use a fast shutter speed to freeze movement. (A fast speed is more than 1/500 second)
Use a slow shutter speed to show movement. (A slow speed is less than 1/30 second)
How to structure your assignments
If you follow this working method you will get the maximum benefit from each of the four assignments in Level 2 Photography. This is not a random set of guidelines - it's the result of analysing how creative people, like photographers, approach a new creative project, commission or assignment. This is how I work - or pretty close to it - and how most other photographers work as well, with variations.
Visual Research. Start by looking for ideas and inspiration on-line through websites like Alamy.com and Flickr . The idea is to see what other photographers have achieved with similar subjects or techniques, to inspire ideas of your own. When you have found 2 or 3 examples of images that you like and can use as inspiration, save them to a file on your computer called "research" or "inspiration" or something like that.
Ideas & Planning. Keep a notebook or document where you list/describe your ideas and what you hope to produce on this assignment and then do some planning. Planning will include thoughts about equipment, location, lighting, weather, models, props and other necessary items that you will need to have in place in order for you to succeed with your ideas. All photographers do planning, often in a notebook that stays with them.
Test shots and analysis. The point of doing test shots is to try out your ideas and techniques and see if it all works out. By doing this you will learn what works and what you need to change and you will have the opportunity to re-asses your photos and do them again to get a better finished result. The process will allow you to learn quickly from mistakes and through experience. Take your best 3 or 4 test shots and do an analysis of strengths, weaknesses and what you learned or are going to change/do differently. The analysis of strengths and weaknesses is critical for your understanding and experience.
Final photography. Now you are ready to undertake the final photography, with all the benefits of research, planning, testing and analysis.
Project Evaluation. Do a project evaluation and outline what went well and worked, you need to keep doing that the next time; And what went wrong or didn't work so well - try not to do that again. What do you think you have learned from the assignment as a whole? The project evaluation is intended to encompass the whole process of the assignment including research, ideas, planning, testing and final photography.
Hints on Test Shot Analysis
What have you done?
Why have you done it?
How have you done it?
Does it work?
Why? / Why not?
Are you going to develop the idea - if not why not? If you are, then describe why?
Hints on Project Evaluation
How well have I done with this project?
Have I used my time well?
What would I have done differently in retrospect?
Have I made the most of the available resources?
Have I researched a broad range of artists and inspirational material?
What part of the project am I least happy with?
What part of the project am I happiest with?
Has my project changed much from my first ideas as it has developed?
Have I learnt about any materials, techniques or processes that are new to me?
What artists have I learnt about?
Have I adopted any of their techniques and philosophy?
Is there anything I might use again within any future projects?
Next Week: Week 15 Assignment 2 Creative use of apertures (depth of field)
Your Task:Your task is going to be to produce two photographs that demonstrate the effective and creative use of shutter speeds. The important point there is "creative use". It's easy enough to set a fast and slow shutter speed on your camera and shoot away but so what? That doesn't make your photos creative or useful or unique in any way. The trick is to consider whether the subject will benefit through using the shutter speed in a creative way. It will, if it has movement. Static subjects don't care about shutter speed. They look the same at 1/1000 second as they do at 1 second. Moving subjects however look completely different at these speeds. So being creative with shutter speeds demands subjects that have plenty of movement and your job is going to be to decide how best to treat the subject - fast to freeze movement or slow to show motion.
Here's two photos that use a slow shutter speed to create or enhance movement. The light trails take the idea of movement and turn it into something that would not otherwise be visible to the eye. I shot this shortly after sunset on a hill overlooking the M6 in Cumbria, where there was a curve in the road to create a more interesting shape. The shutter speed was about 30 seconds but I only figured that out through test shots - which took about 5 minutes to do. The key with picture like this is not to wait until dark but start shooting shortly after sunset when there's still some light in the sky. Otherwise you get no background ambient light and the sky goes black - which is boring.
So:
Use a fast shutter speed to freeze movement. (A fast speed is more than 1/500 second)
Use a slow shutter speed to show movement. (A slow speed is less than 1/30 second)
How to structure your assignments
If you follow this working method you will get the maximum benefit from each of the four assignments in Level 2 Photography. This is not a random set of guidelines - it's the result of analysing how creative people, like photographers, approach a new creative project, commission or assignment. This is how I work - or pretty close to it - and how most other photographers work as well, with variations.
Visual Research. Start by looking for ideas and inspiration on-line through websites like Alamy.com and Flickr . The idea is to see what other photographers have achieved with similar subjects or techniques, to inspire ideas of your own. When you have found 2 or 3 examples of images that you like and can use as inspiration, save them to a file on your computer called "research" or "inspiration" or something like that.
Ideas & Planning. Keep a notebook or document where you list/describe your ideas and what you hope to produce on this assignment and then do some planning. Planning will include thoughts about equipment, location, lighting, weather, models, props and other necessary items that you will need to have in place in order for you to succeed with your ideas. All photographers do planning, often in a notebook that stays with them.
Test shots and analysis. The point of doing test shots is to try out your ideas and techniques and see if it all works out. By doing this you will learn what works and what you need to change and you will have the opportunity to re-asses your photos and do them again to get a better finished result. The process will allow you to learn quickly from mistakes and through experience. Take your best 3 or 4 test shots and do an analysis of strengths, weaknesses and what you learned or are going to change/do differently. The analysis of strengths and weaknesses is critical for your understanding and experience.
Final photography. Now you are ready to undertake the final photography, with all the benefits of research, planning, testing and analysis.
Project Evaluation. Do a project evaluation and outline what went well and worked, you need to keep doing that the next time; And what went wrong or didn't work so well - try not to do that again. What do you think you have learned from the assignment as a whole? The project evaluation is intended to encompass the whole process of the assignment including research, ideas, planning, testing and final photography.
Hints on Test Shot Analysis
What have you done?
Why have you done it?
How have you done it?
Does it work?
Why? / Why not?
Are you going to develop the idea - if not why not? If you are, then describe why?
Hints on Project Evaluation
How well have I done with this project?
Have I used my time well?
What would I have done differently in retrospect?
Have I made the most of the available resources?
Have I researched a broad range of artists and inspirational material?
What part of the project am I least happy with?
What part of the project am I happiest with?
Has my project changed much from my first ideas as it has developed?
Have I learnt about any materials, techniques or processes that are new to me?
What artists have I learnt about?
Have I adopted any of their techniques and philosophy?
Is there anything I might use again within any future projects?
Next Week: Week 15 Assignment 2 Creative use of apertures (depth of field)
Cool
ReplyDeleteDo you think that this really works?
ReplyDeleteIf you own a blog you know the importance of keeping your blog fresh and your audience interested. It can be challenging to come up with blog posts that won't bore your visitors and is interesting enough to keep them coming back.
ReplyDeletearticles about homework
Best Sydney Photography Courses are ideal for beginners who are new to digital photography.
ReplyDeletePhotography Courses Sydney
It’s awesome that you want to share those tips with us.I assume lot of us that commented on this post are just starting to search for different ways of blog promotion.This is definitely the article that I will try to follow when I comment on others blogs.Cheers
ReplyDeleteVERROLYNETRAINING
Took me time to read all the comments, but I really enjoyed the article. It proved to be Very helpful to me and I am sure to all the commenters here! It’s always nice when you can not only be informed, but also entertained!
ReplyDeletecustom suits woodbridge
I read this informative blog. Your writing technique is impressive and enjoyable to read. Learn about the techniques of using different shutter speeds as a creative tool to control movement. Thanks for taking the time to share your knowledge with us. Now it's time to get chauffeur service birmingham for more information.
ReplyDelete